Do you need to improve the SEO of your Shopify store? I will tell you a few tricks and strategies that anyone can follow to have a store that appears in the first results of Google.
SEO for Shopify is one of those questions that always comes up when a brand wants to choose Shopify as their ecommerce platform.
There is a myth that Shopify is a platform where SEO is going to be terrible, that it is not going to allow you to get results and that it is going to be the cause of your failure in ecommerce.
Nothing could be further from the truth.
As you can see in the following examples that I am going to give you, you can search for keywords in Google and the first results are occupied by brands in Shopify:
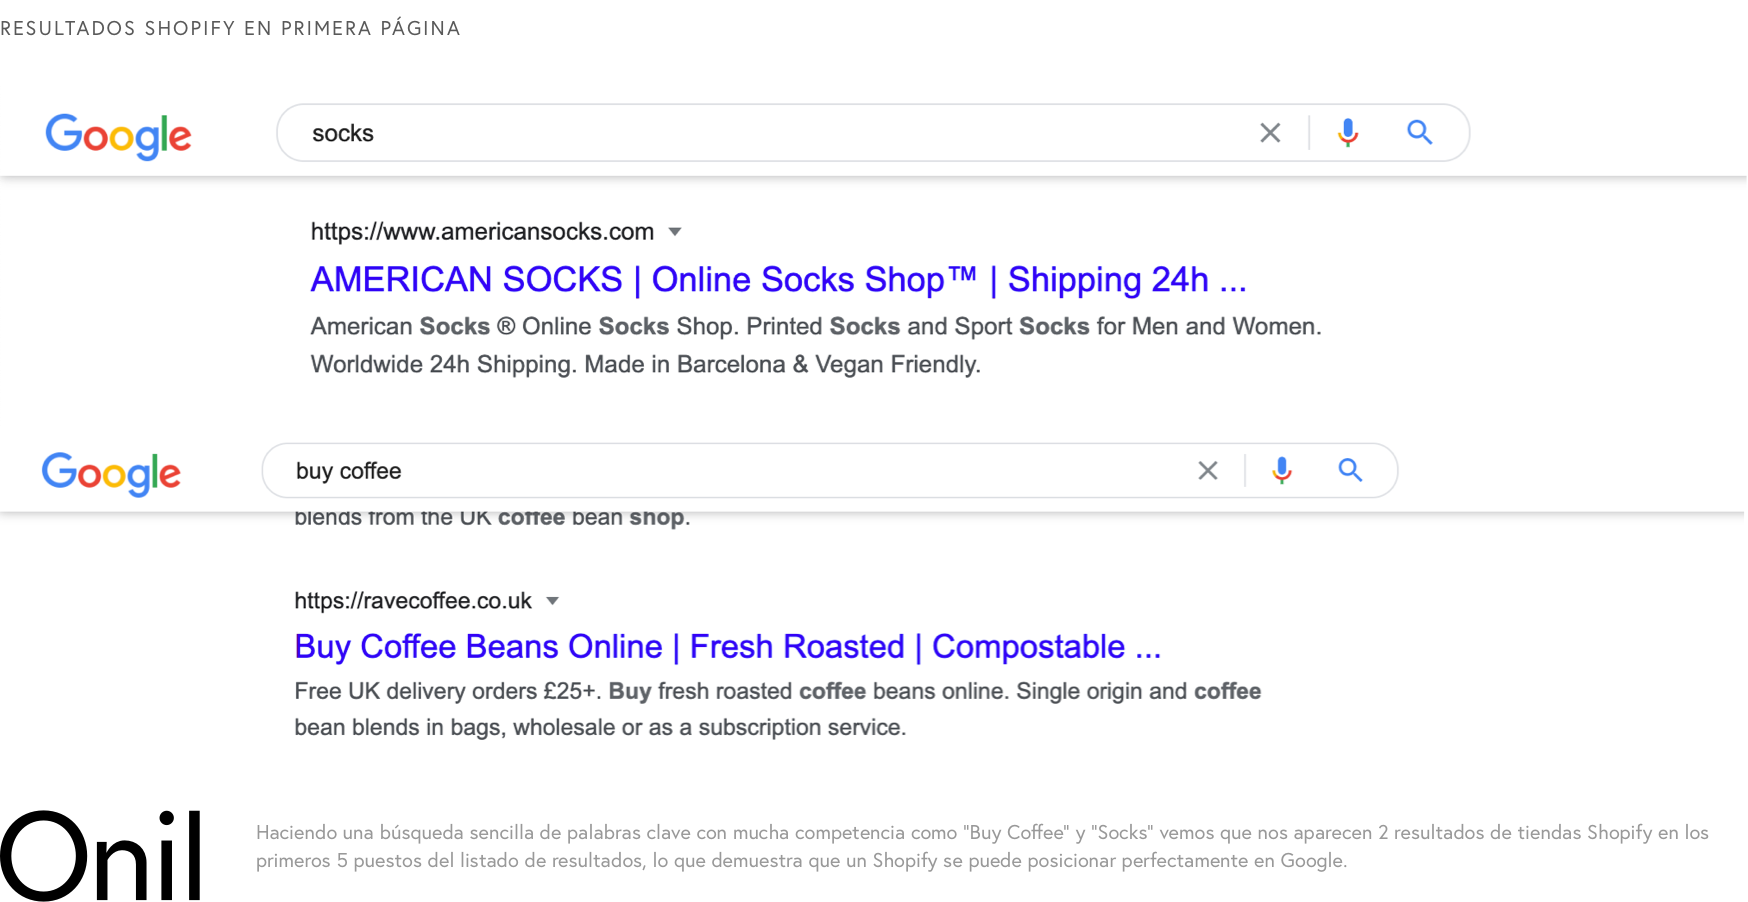
You see, despite the fact that they say that SEO is going to be the worst with Shopify, countless brands are at the top of the results.
So why is that said about Shopify?
Shopify, like any other platform, has its way of doing things and in some cases it may seem like a limitation, but in many others, it is a liberation.
At Shopify, they'll tell you that you won't be able to edit the robots.txt file, you won't be able to create the sitemap.xml your way, and you won't be able to do all of those things that sound so complex and advanced that SEO Pros can tell you about, but can you? it is necessary?
We have already seen with the previous examples that NO.
They will also tell you that Shopify URLs cannot be modified to your liking, that there are strings of words that will be in the URL and they will hurt you for not being able to delete them, but once again, is it necessary?
NOUP!
Or do you think that Google is going to hurt more than 1 MILLION (if I said 1,000,000) stores in 175 countries , 18% of the ecommerce stores in the world according to Builtwith because they have the word products in the URL of the products?
Of course the more flexibility you have in managing all aspects of the store the better, but the main thing is to make sure that the basics are set up correctly and at the same time have a platform that is easy enough to manage that it compensates for any other alleged problem.
What things can you do with Shopify?
Let's go to the important thing.
What does Shopify include as standard and what can you add to it so that you can improve your SEO for Shopify?
Well, everything.
We go one by one seeing everything we can do to have a 100% optimized store.
On-page SEO
First of all, we have on-page SEO, that is, the one that is based on having everything correctly labeled so that Google and company know exactly what each page is about.
Whether your on-page SEO is good will depend on the template you use, so if you are not an expert in SEO issues, it may be interesting for you to contact people who do know (Hello! at Onil we are dedicated to this, among many other things).
In any case, if you don't want to contact experts in the field, I'm going to tell you a trick that you can use to find out if the template is okay to use.
But first, let's see what we should be clear about when improving the technical SEO of our store.
All shop pages should have (later you will see a tool with which you can check this):
- A single H1
- at least one H2
- The page must have a title meta-tag and it must be unique.
- The page must have a description meta-tag and it must be unique.
- Images must have a corresponding ALT tag that describes the image
- That the products and the page in general have the Schema marking, especially important in an ecommerce store
And moving on to the theme of the template...
In case you are going to use an official template from the Shopify market, it is very likely that it is correct, but it never hurts to check it.
What you are going to do is download the Mozbar Chrome extension from MOZ (some cracks in terms of SEO, it must be said).
Once you have it installed and you have made a FREE account you have to look for the templates that you like the most.
As an example we are going to see a template from the Shopify marketplace , you look for the ones that you like the most or that fit best with your brand.
Once the templates are selected, you enter each one of them and open the preview.
Dude, now comes the worst!
If you don't know anything about programming, you're going to have to get your hands dirty, but we're going to make it as easy as possible.
And don't worry, I'll put a little GIF for you so you can see it in action.
Click with the right mouse button and hit inspect.
Wow, the stuff out there.
Right now you are seeing the guts of the page.
Click on the console tab and paste the text below, but first we need to change the context of the dropdown to top:
Insert this code .
And wow!
We already have the URL where the preview is hosted, you just have to right-click and open it in a new tab.
And you will say, why have we done this if the same thing appears?
Well, it is not exactly the same because without this step we could not use the Moz tool to check the technical SEO of the page.
It is what you have to want to do things yourself, which costs more than it seems.
Once here you will have to open the home page, a product category page and a product detail page.
We could check all the pages but these are the main ones in a store.
We click within each of the pages on the Mozbar icon and we will verify that all the pages have the following:
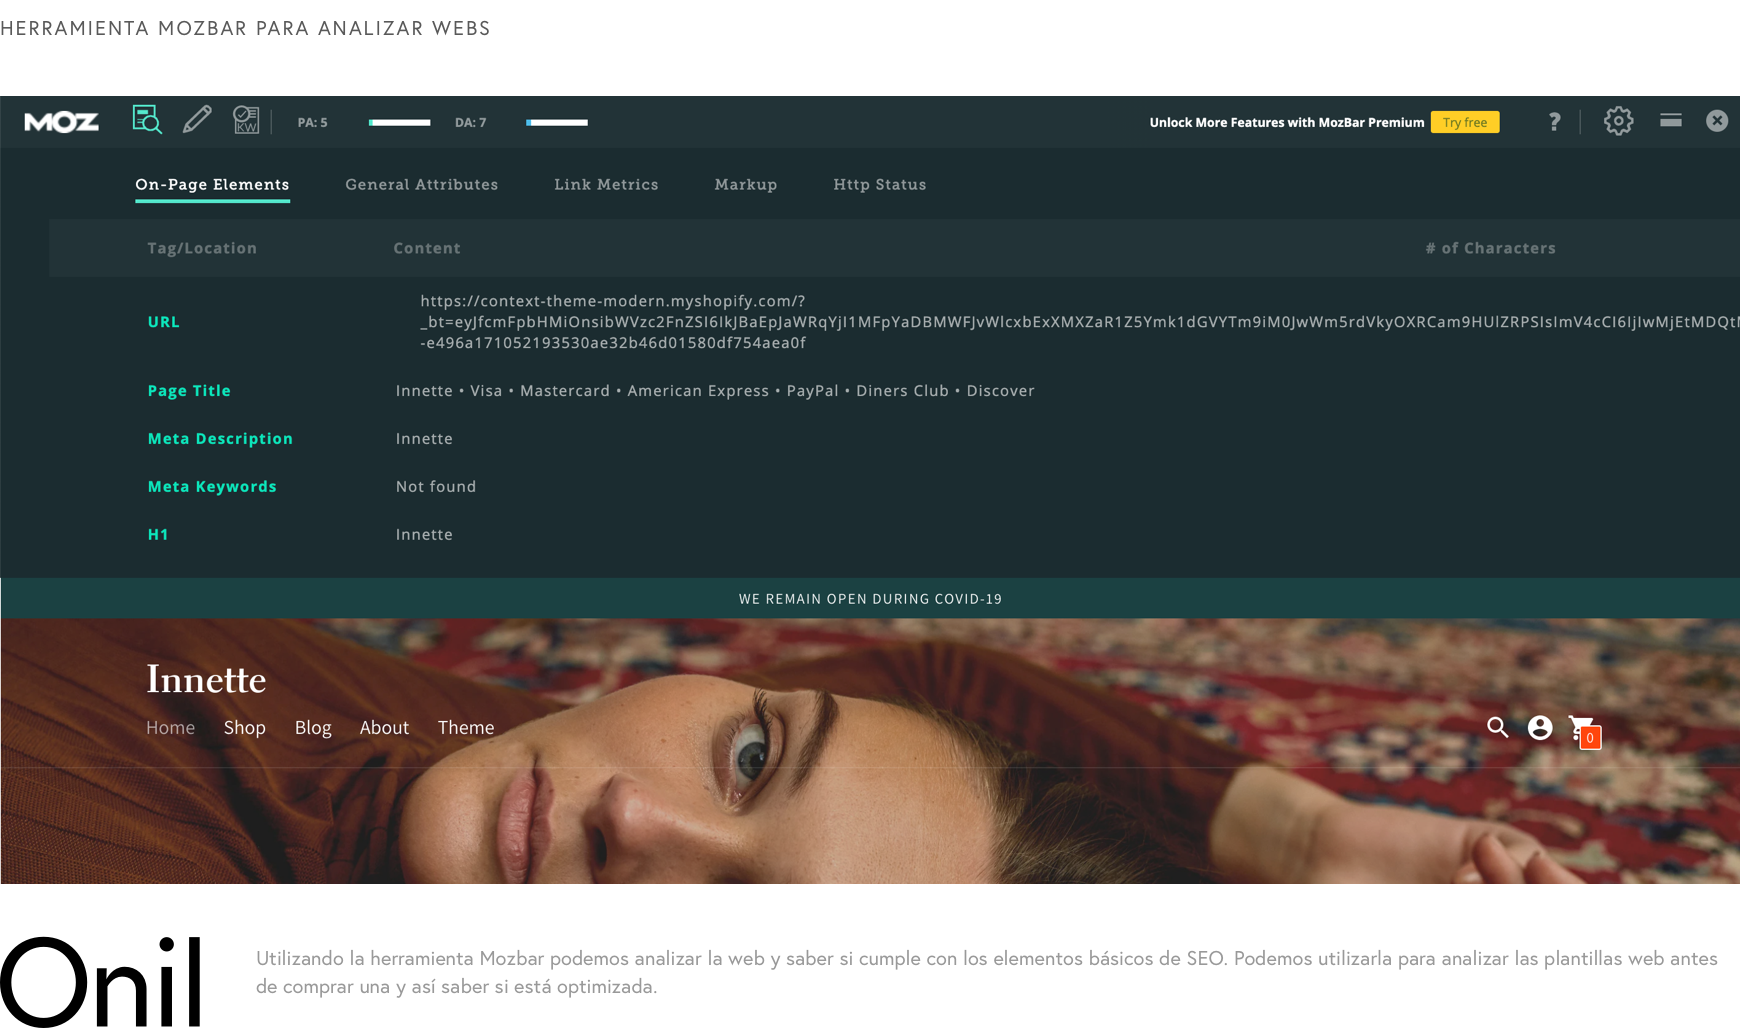
Inside the On-Page Elements tab
- A meta title is necessary
- A meta description is basic
- A single H1 (each is separated with a •)
- At least one H2 (each is separated with a •)
- If there are images on the page you are viewing, there must be at least 1 ALT text for each one.
Inside the General Attributes tab
- Although this refers more to technical SEO, we want the Page load time to be as short as possible, especially under 3 seconds.
Inside the markup tab
- Ideally, the 4 types that exist appear with a green tick instead of a red stripe.
For each thing that does not comply with the template, we will put a negative point in the excel that I have left you in the following link:
IMPORTANT! Remember to make a copy of this excel to be able to make changes.
Once this is done, we will analyze the template with Google Pagespeed Insights.
For this, all you have to do is go to the Pagespeed website and in the URL field enter each of the URL's that we have already analyzed before with Mozbar.
The results in this case are very easy to understand, from 1 to 100 Google will tell you how optimized each of these pages is and you will have to record this result in the same Google Sheets as before.
And we are ready to choose template.
Technical SEO is more complex than this, but to choose a good template it can be worth it.
In the event that you do not want to change the template, the steps are the same.
Analyze your current template and you will see the problems that may exist.
All this part of the on-page SEO can be modified in your Shopify store without any problem. At the end of this article I will tell you what you should do to optimize it to the maximum, but at this point it was important to tell you about the importance of the template you choose for your store.
technical SEO
Technical SEO will depend a lot on the template just like on-page SEO.
In this case, we are talking about complex development issues that only an expert will be able to solve, but it doesn't hurt that we discuss things that you can do in your Shopify to improve this part.
Technical SEO refers to the performance of the web and to make it easier for the Google robot to index your page, the better performance and easier indexing, the better SEO, it's that simple.
Among the things you can do with Shopify you have:
- Specify a preferred domain
- Optimize URLs
- Create a simple navigation
- Add a breadcrumbs or breadcrumb to your web
- Implement Schema Markup
- Add canonicals to URLs
- Optimize 404 Pages
- Have a fast website
- Create a mobile-friendly website, that is, one that is easy to manage on the mobile
If all this sounds Chinese to you, don't worry because in the tactics section I will tell you a few tricks to optimize all these issues.
On the other hand, Shopify will take care of:
- Create an optimized sitemap
- Generate an SSL certificate automatically
- Add an optimized Robots.txt file
As you can see, in Shopify you will be able to do the main thing at the technical SEO level.
Off-page SEO
About off-page SEO we are not going to talk much in this article because anything you can do on Shopify you can do on any other platform.
As the name indicates, off-page indicates that it is done outside the web.
In future articles we will talk about strategies and tactics related to off-page, but if you want to soak up things that you can do, I would take a look at this guide by Neil Patel , one of the digital marketing gurus worldwide.
How you can improve SEO positioning in shopify
Now yes!
We now come to the most interesting part, that of the strategies and tactics that you can follow to improve SEO positioning in Shopify.
We are going to see everything you can do so that your store is optimized to the maximum.
An H1 on every page
Regardless of whether you use a template or have created a custom store, it is vitally important that all the pages of your store have an H1.
The H1 is the title of the page and it is what gives Google and especially the users the general context of what the page is about.
It is one of the main factors when it comes to positioning your page for a keyword.
You can find the H1 on each page using the Mozbar tool that we have mentioned before or you can use the inspector ( ATTENTION : We are talking about the tools used by expert developers) and continue searching for the text "<h1".
And as everything has its tricks.
1) It has to stand out
What good is a title that no one sees? You are welcome.
Look at the following comparison and tell me which is the H1 on each of these websites.
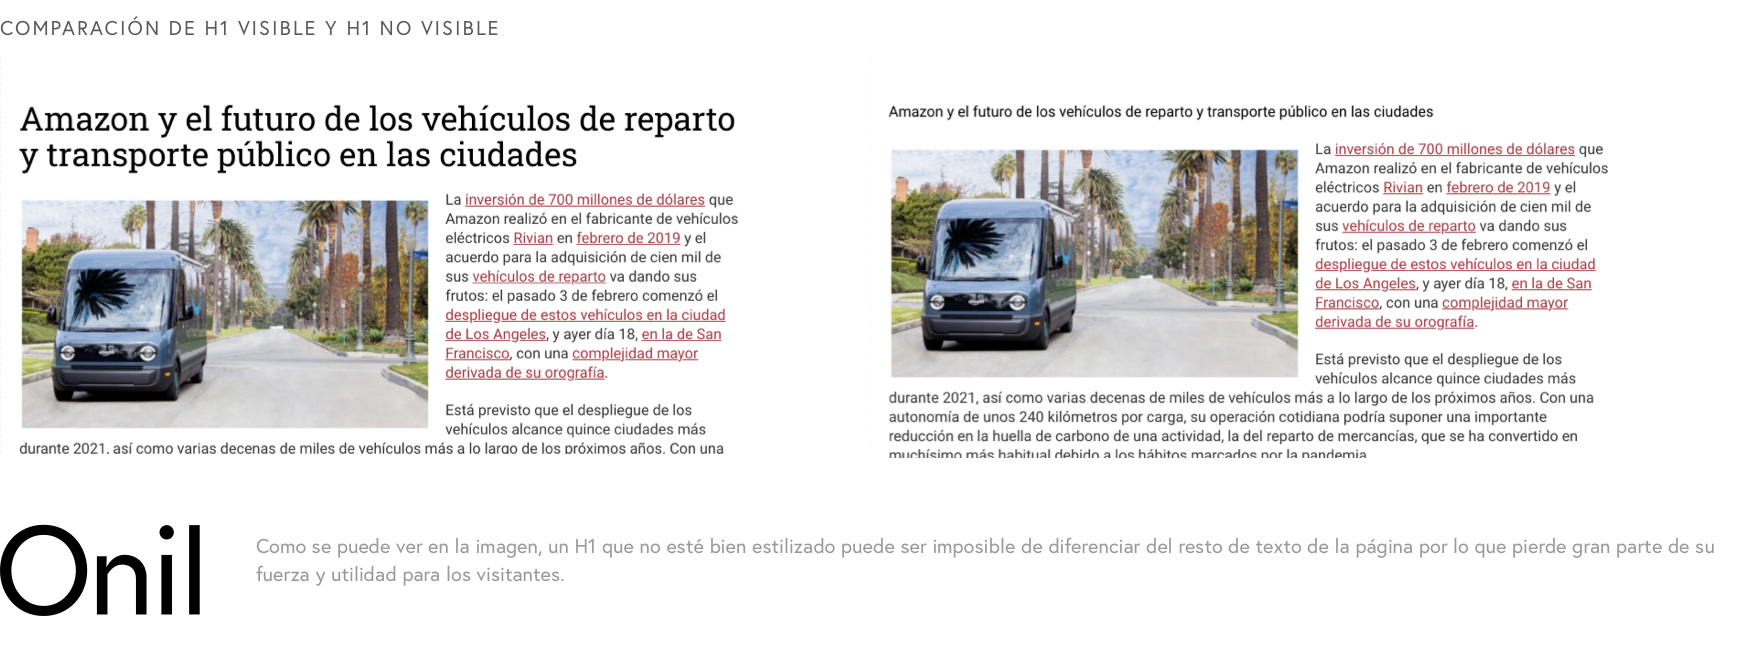
You see, it is very clear that the H1 has to dominate the screen.
This will depend on the template you use, so be clear that if it is not visible, it is better for an expert to fix it for you.
2) It is better to stick to 20-70 characters
An excessively long title will only confuse users and Google.
Try to keep it concise and make clear the objective of the page, collection or product that your user is visiting.
3) With better keywords
Keywords are very important for a website to position itself and generate visitors from Google.
Fanciful names may seem very original but they will not help you when it comes to generating visitors.
And if not, look at Zara.
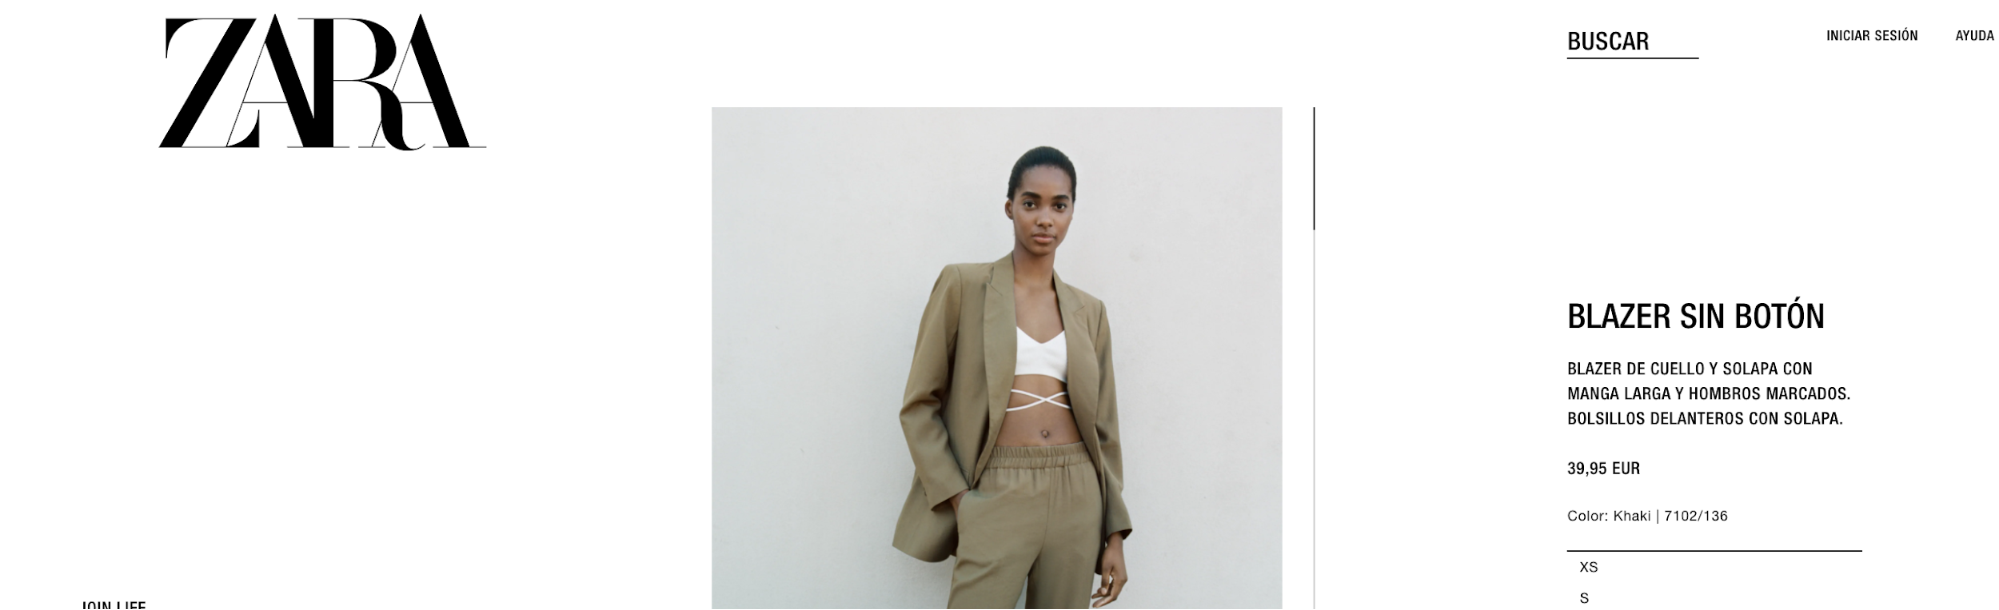
A huge brand that doesn't really need the help of SEO to get visitors, as according to Similar Sites it has 74 Million monthly visitors, but it still follows very basic naming principles for product names and they are perfectly aligned. with which you could search for a user from your target audience.
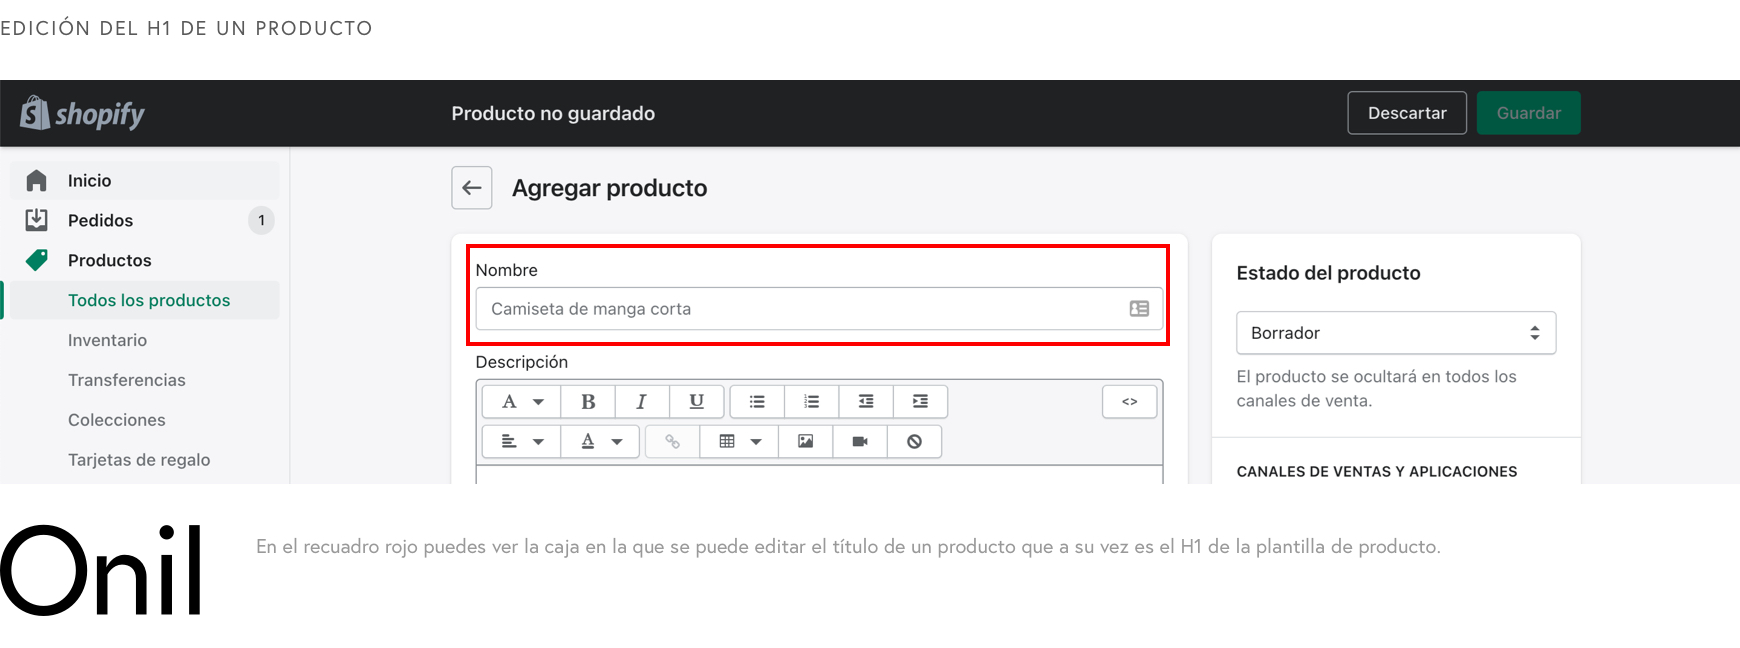
And how do you do it in Shopify?
Unless you have a template made with very little desire, the H1 will correspond to the title of the page you want to edit, that is: - If you want to edit a product it will correspond to the name of the product - If you want to edit a collection it will correspond to the name of the collection - If you want to edit a page it will correspond to the name of the page - If you want to edit a blog article it will correspond to the name of the article
If you don't know what I mean, check out the screenshot below.
An H2 for each section
H2 is also very important, although not as much as H1.
Let's say the H2 references the subheadings of the pages.
In this case, we are going to use it to separate some sections from others and give users clear information about what they are going to find.
Not only will users use it, but Google will also use it to better understand the content of the page.
Get in the habit of adding H2 to all the content you create.
And how can you do it?
It is very simple.
When you are going to add content to the different pages, products, blog articles and product collections, you will have to fill in the description field and this is where you should add the H2.
In the following GIF you can see how to do it.
Remember that what you should add is the H2 and never the H1, since the H1 will be occupied by the title of the page and it is not necessary to have more than one H1 on the same page.
No meta-title, no visitors
The meta-title is simply the title you see in the Google results when you do a search.
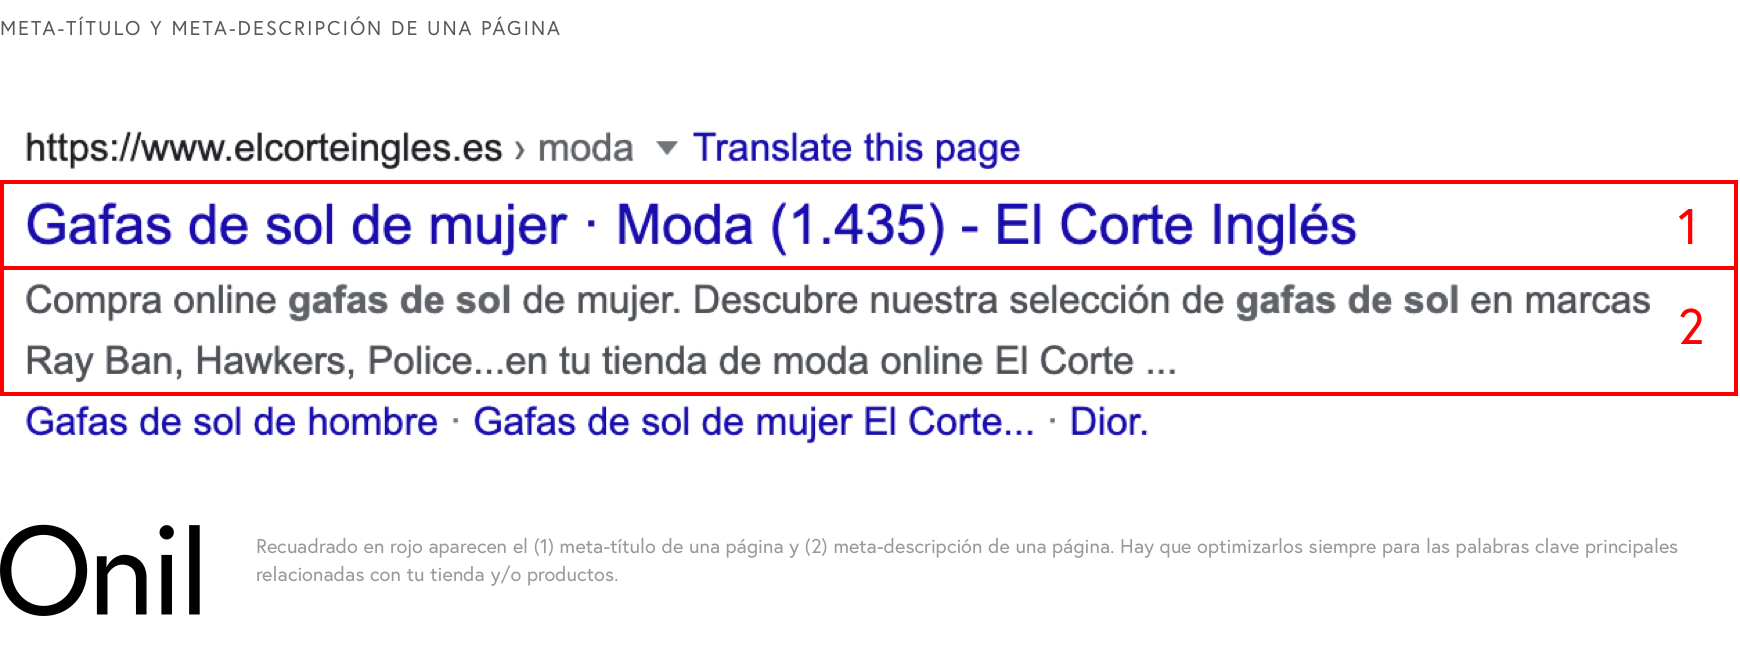
This title will serve to encourage users to access the page, because you already know that an interesting title is what makes you click on a Google result.
And in turn it will serve so that Google knows exactly where to show your page.
In Shopify, this title will never be empty, although it will depend on the template you use.
In the event that you do not fill it in, it will be automatically filled in with the same title as the content you are editing.
That is, meta-title = H1 when you don't edit it.
But this is NOT optimal if what you want is to encourage users to enter your page and position your results in Google.
So get to work!
To edit it we will go down to the bottom of the page you are editing. Look at the GIF.
In this box "Preview the results in search engines" you will have to click on "Edit SEO of the web page" and the editable fields will be displayed.
As you can see, you will be able to edit the title, description and URL.
Regarding the title, you should optimize at least those of the most important products but if you do not have thousands of references you should try to optimize all the titles.
To optimize them follow these steps:
- Include in the title the main keyword for this product or page at the beginning of the meta title and if possible it is a long-tail keyword to position the web in words with less competition.
- Make it attractive to the client, think that it is the first thing that anyone who has never visited it will read on your website.
- Take advantage of putting the name of your store at the end of the text so that your store begins to be known and to maintain a standard structure. NOTE: Some templates already include the name of the store at the end of the meta-title, so it would not be necessary.
Without meta-description the bounce rate is huge
The meta description is the key to getting more visitors and reducing the bounce rate.
The rate of what?
The bounce rate, that is, the users who enter and leave without doing anything on your page.
And the higher the bounce rate, the worse signals Google receives from the interest that visitors have in your page.
So, continuing in the SEO box we were in to edit the meta-titles, we are going to go to the description part.
To optimize it, follow these steps:
- Include in the title the main keyword for this product or page and possibly a long-tail keyword to position the web in words with less competition.
- Include words that incite action such as buy, click, offer, etc.
- Show them the benefits of your store like free shipping or returns, etc.
- And above all make the title attractive.
And voila, we already have a super-optimized description.
optimized urls
We are now at the end of the SEO box.
Now we have to edit the URLs.
You may not have noticed, but I am sure that many times you have come across websites that have URLs made up of numbers or things like product-copy, etc.
NO!
That's a big NO.
Do not duplicate products or forget the URL of these.
It is very important that the URL is optimized to improve the positioning of your Shopify store.
In Shopify you already know that the URL has to follow some pre-established patterns, which are the following:
- Products : https://www.mydomain.com/products/ {{ URL de producto que puedes editar }}
- Product Collection : https://www.mydomain.com/collections/ {{ URL de colección que puedes editar }}
- Pages : https://www.mydomain.com/pages/ {{ URL de páginas que puedes editar }}
- Blog Articles : https://www.mydomain.com/blogs/ {{ URL del blog que puedes editar}} / {{ URL de artículo que puedes editar }}
There are a few more URLs that come up when adding tags to a product collection, or when a product belongs to a collection, but hey, you won't be able to customize those without the help of a Shopify expert .
We are going to focus on editing the parts that we can modify (what is between {{ xxx }} in the previous URLs).
Let's try to get them all to be:
- as short as possible
- That include the main keyword
- In the case of products that follow the brand-name-of-product structure and if you have different products, also add the color, size or any of the variants that exist, but only if you have created them as separate products and not as variants of the same product.
And that they do not have:
- Dates unless the date is very necessary. For example, a product with the date 2020 in the URL may discourage clicks because it looks like an out-of-season product.
- The name of the collection to which they belong.
All images with ALT tag
Unlike you, Google doesn't see what an image is made of, but instead sees the explanatory ALT text and the file name.
What does this mean?
Well, if you don't help them to know what the images are about, they won't be able to index them correctly and without correct indexing you will be losing the possibility of having new visitors.
So, knowing this, what do you have to do?
Simply add an ALT tag to each of the images you upload to the web.
This tag will allow Google to know what the image is about and what to do with it, such as adding it to its image search results for an interesting keyword.
Doing it is very simple in Shopify, every time you upload an image to Shopify you will have a field in which to add an ALT tag like in the following GIF:
EYE! The fact that you put the ALT tag on the image does not mean that it will appear on the page because that will depend on how the template you use has been created.
I am going to tell you a trick so that you can see if the ALT text that you have put appears on your website or not, take a look:
Once you've posted the image, go to the page you've posted it on, right-click and select “view page source”. Do command (⌘) + f on Mac or control + f on windows and the search engine will open to find a text. In the search engine write the ALT text that you have put in the image and if it appears on the page everything will be correct.
You don't have to do this for every image you add to the page. For example, if you add the ALT to a product image and it appears on the page, whenever you add the ALT to the product images they will appear on the page.
Redirect all users to the same domain
I guess you've already noticed.
Before, practically each of the websites you visited had the famous "www" before the address of the page.
But it is no longer the case.
Now there are many websites that simply carry the name and the .com, .net, .anything. It may seem silly but deciding whether to use "www" or not is an important step and once decided you have to stay with it forever.
Because?
Because your website will appear much more consistent for your users and the different search engines.
But don't worry, in Shopify it's very easy to do it.
You just have to go to “Online Store” > “Domains” > “Change the main domain” and choose if you want to use the version with www or without it.
But it doesn't end here.
Once this is done, you will have to go to the domains that you have connected to the store, click on "Manage" and check that the option to redirect users to the main domain is selected.
Depending on whether you have an international URL structure in your Shopify store or not, you may not want to redirect users to the main domain, but that's only for certain cases.
By the way, when deciding whether to use www or not, use www .
Among other things because it will have benefits in terms of performance, security and it will give you more flexibility in case your website grows.
Navigation the clearer the better
The easier you make it for your users, the more sales you will have.
But a simple and understandable navigation will not only help your users but will also help Google to better understand your page and position it in its results.
How can you do this?
First you have to correctly organize all the pages you have on your website.
Group similar pages by categories, reduce the number of steps to go from one page to another and above all, add links to all the pages of your store in the different menus of your website.
It is important that all pages are linked because the way to discover new pages for Google is to bounce from link to link (although you can also use the sitemap.xml generated by Shopify itself).
Sometimes there are pages that don't need to be linked or at least don't need links from the main menus.
No problem.
But if possible all the pages have to be linked from the menus.
If you have a very large page or your store does not stop growing and you see that the menu begins to get complicated, the ideal is to use a Shopify app to create a mega menu, for example, or contact an expert to optimize the menu that you already have.
Write unique descriptions for each item
Duplicate content is a big NO for Google.
Every time you repeat the same texts on different pages, you send negative signals to Google that impact your positioning.
Many times duplicate content is used to manipulate rankings and how Google catches you has messed it up.
But solving it is very simple.
Get in the habit of writing different content for each page, product, product collection, or blog post you make.
Nothing happens if you have to repeat phrases because it is logical that if, for example, you sell t-shirts, the composition, the care information, etc. will be the same
But the important thing is that you do not copy and paste all the information from product to product and that you write different information on all pages.
The best thing you can do is to focus the information on each page around one main keyword and try to use keyword variations to rank different pages in different Google results.
Make it easy for Google and visitors to navigate with clear breadcrumbs
I'm sure you've seen it. And sure you don't have it.
I'm talking about breadcrumbs or breadcrumbs, which is simply a list of links to show the user and Google the path they have taken to get to where they are.
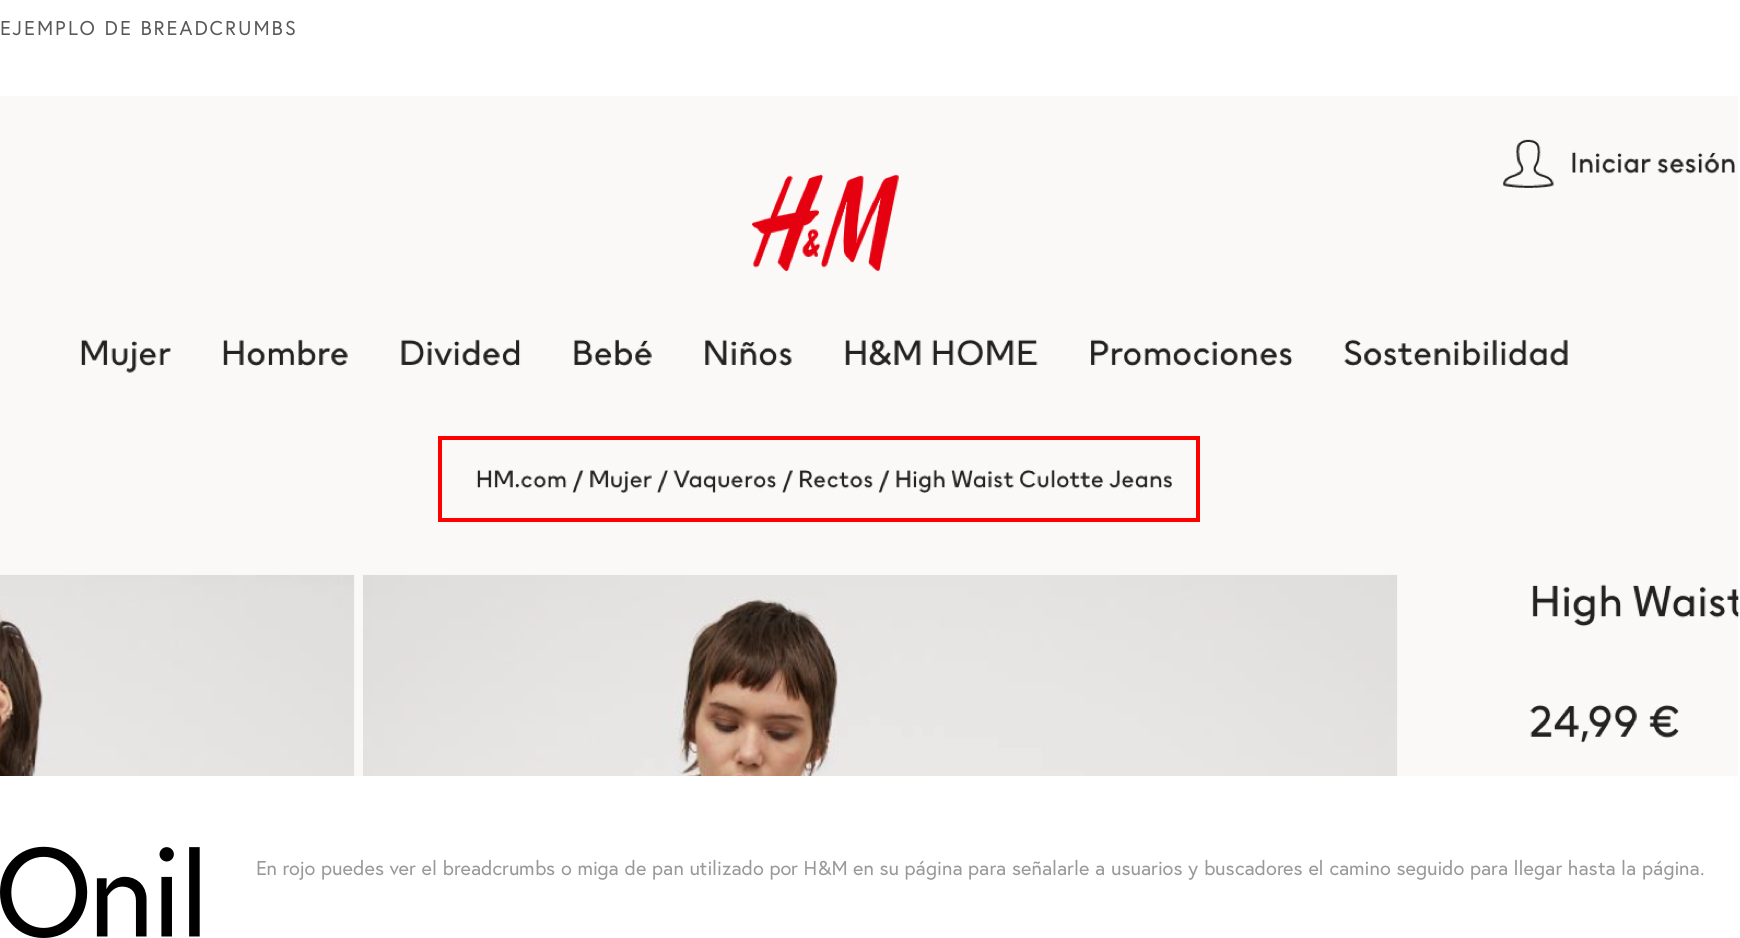
Although in Shopify it is not very advanced, since there will probably never be more than 3 levels of navigation, it is interesting to add it to facilitate navigation.
With Shopify it is very easy to create it and add it to your website, the downside is that if your template does not include it and you do not have code knowledge, it will be difficult for you to add it to the website.
In any case, even if you do not have computer knowledge, I am going to tell you how you can do it in case you want to cheer up.
Go to Online Store > Themes and in the Current Theme click on Actions > Edit the code
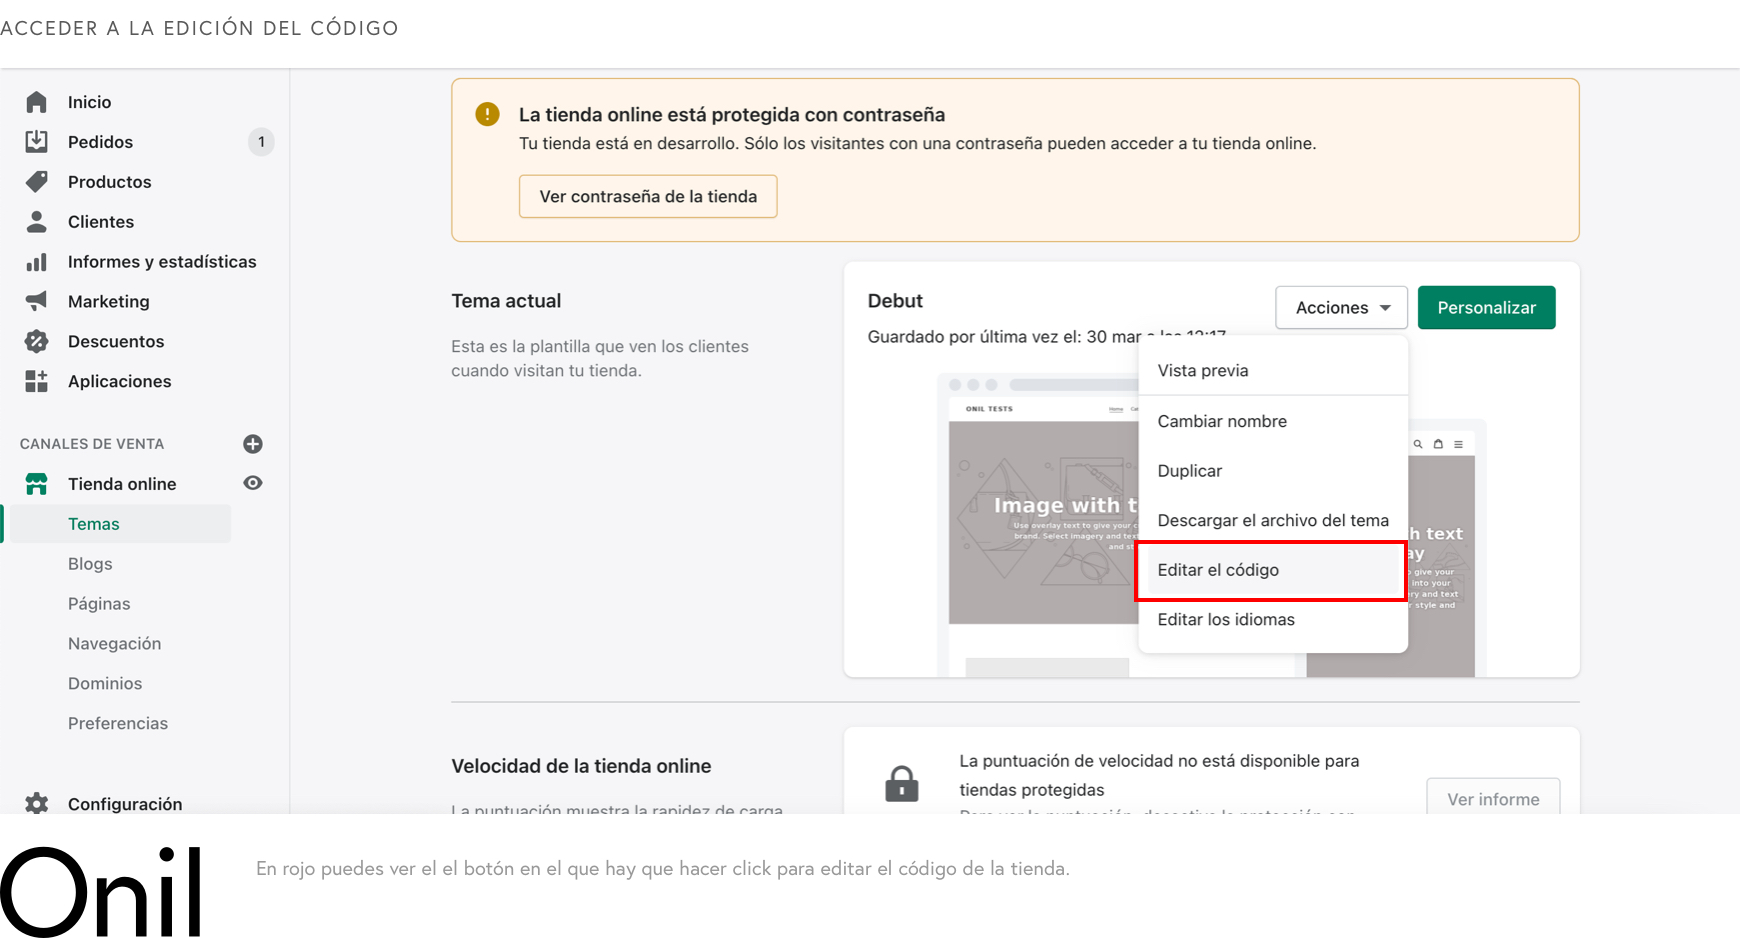
Once here, go down to Snippets and click on Add a new snippet and in the popup that will appear write the word “breadcrumbs”.
Once created, you just have to copy and paste this code courtesy of Shopify and save.
Insert this code .
We already have the breadcrumbs created but now we need to add it to the store.
For this we are going to go to Layout and open the theme.liquid file.
This file is very different depending on the template you use, but we can use the search engine to find what we want.
Click anywhere in the code ( BEWARE : Don't delete anything) and do command (⌘) + f on Mac or control + f on windows. Once the search engine is open, look for the following word “<body”.
Once you have it in view, find the end of the body element. To do this you just have to look for the first “>” you see.
Right on the next line we will inject the breadcrumbs.
All you have to do is put the following code:
Insert this code .
Et voilà.
We already have the breadcrumbs added.
The problem is that it may not turn out as well as you would like and for that you will need an expert to help you.
With Schema everything is clearer and visits increase
Schema markup is one of those features that very few stores use but that generates great value for users who search on Google.
Surely you have already seen results in the searches that you do much more striking than normal.
Results with images, prices, opinions, recipes, etc.
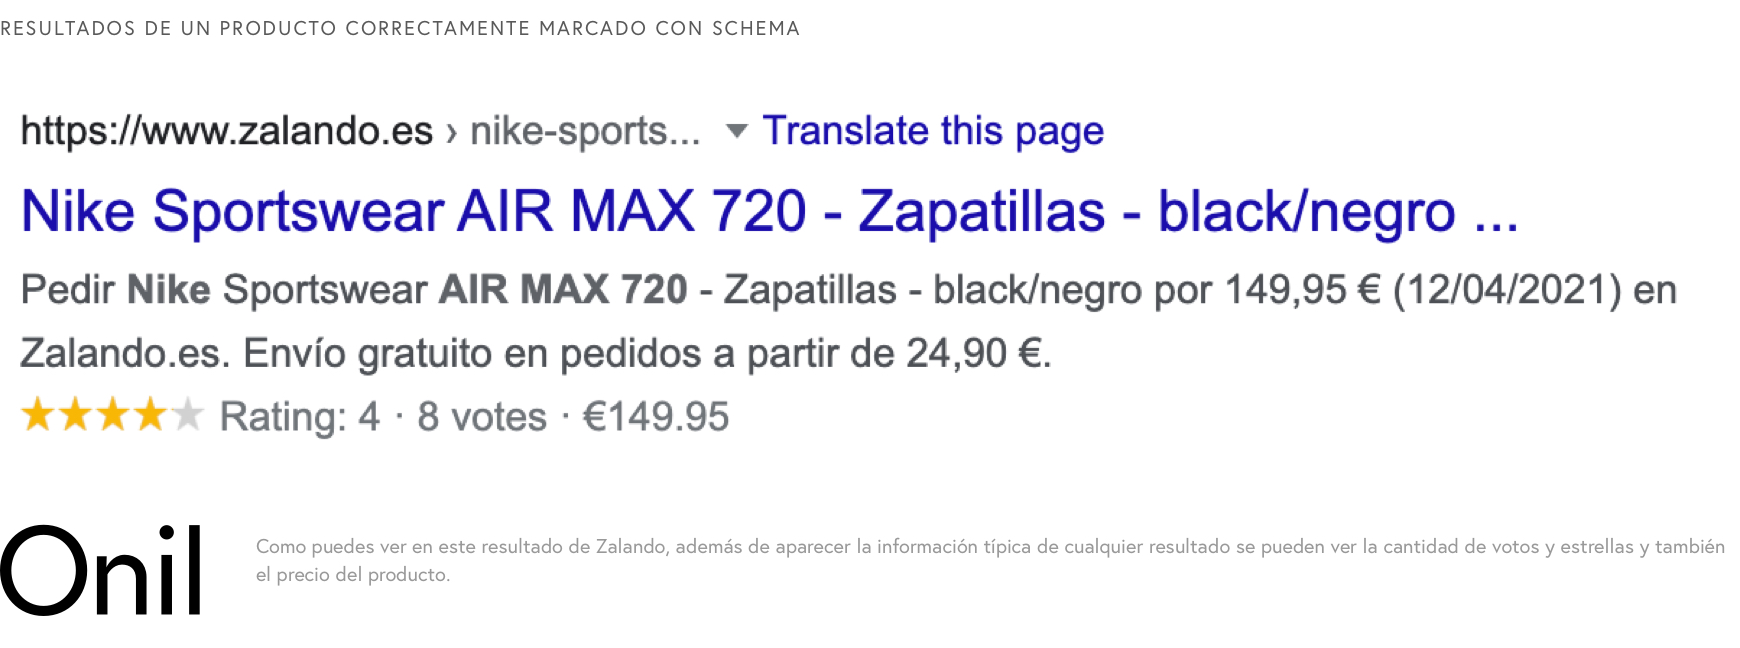
Well, that is easily achieved thanks to the schema marking.
To find out if your website uses the Schema markup, what you can do is use Google's own tool to analyze it.
Just go to the tool and enter a product URL.
After the analysis, Google will tell you if your website includes the necessary data to show enriched results or not and will give you recommendations on what things you should add in case they are not complete.
The Schema marking depends on many factors and the type of content you want to show with enriched results, but since in this case we are talking about an ecommerce, I am going to tell you how you can put the Schema marking of your products in case your website does not have it. include.
It is very simple!
Go to Online Store > Themes and in the Current Theme click on Actions > Edit the code
Scroll down to templates and find the product.liquid file
Once that file is open, simply paste the following text at the end and voila you have the schema. But BEWARE, this only works in case you do not have the Schema marking in your store, do not add it in case you do have it even if it is incomplete.
Insert this code .
Help the lost find their way out
The 404 page of your store is one of those pages that go unnoticed but have great importance.
Think that this will end all visitors who click on a link to your website and that page no longer exists or has been redirected.
This page has to be informative but at the same time help users find what they are looking for.
Or at least encourage them to keep looking.
To do this, you just have to follow some simple guidelines:
- Tell them in friendly language that what they are looking for no longer exists.
- This page must have the same style as the rest of your website and not be a blank page with a “Not found” message.
- You can add suggestions of products and/or categories to navigate to. Even a search engine can be a good option if your store has many references.
- Think about giving users an option to notify you that one of the links to your website is broken.
But above all, when you delete pages, redirect the old link to the most appropriate content to avoid 404 pages.
For example, if you stop selling a product, it is a good idea to redirect that page to the collection it belongs to, such as redirecting a t-shirt to the t-shirts collection, a women's product to the women's collection, or a Nike product to the Nike collection.
In case there is nothing very appropriate, you can redirect it to the home page.
On Shopify it's surprisingly easy to do.
You just have to go to Online Store > Navigation click on URL Redirects and from there add the old URL and the URL you want to redirect to.
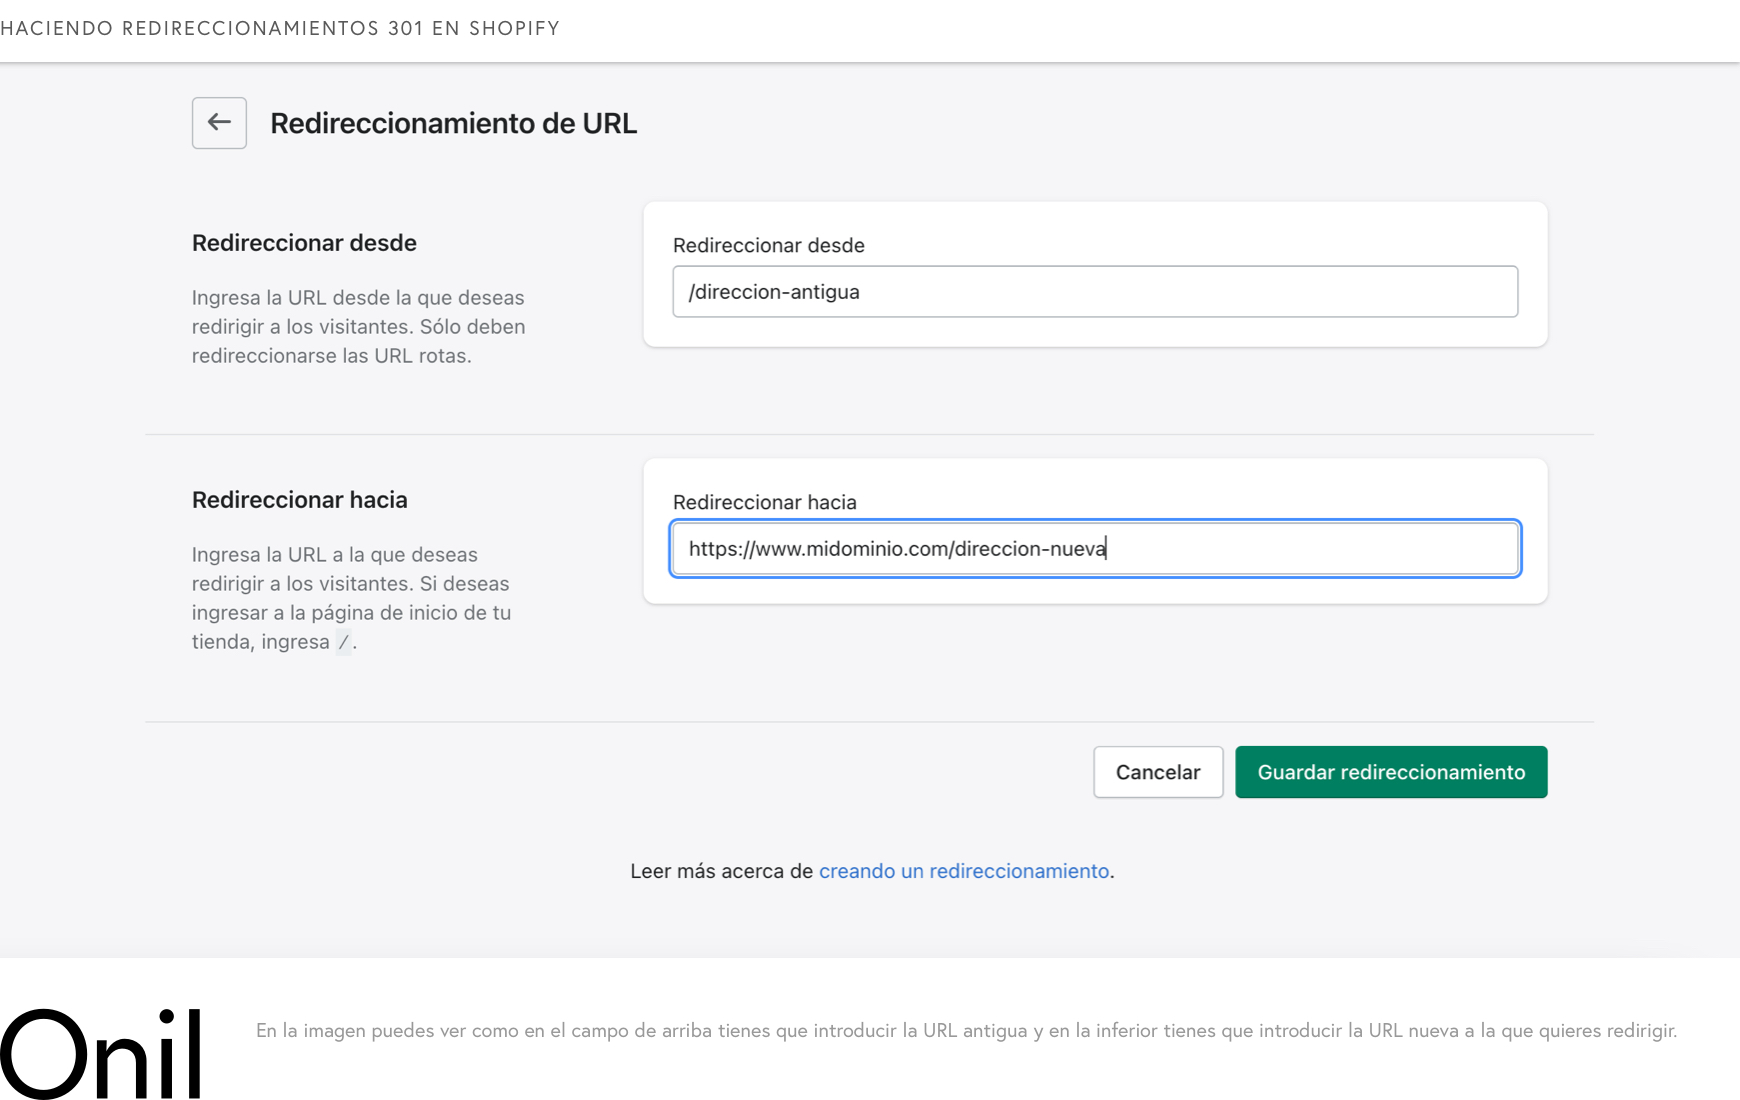
And ready!
We will no longer have lost visitors.
Optimize all images to be lightning fast
We have already talked about the images before when I told you that you have to put ALT tags on all of them.
But there is another very important thing if you want your website to be optimized and very fast.
All images have to be optimized.
What does this mean?
Well, they have to be compressed to the maximum so that they do not make your website slow.
Images are generally the main cause of a website taking a long time to load.
Optimizing them can be a boring and long procedure, but I already told you that it is very important if you want your website to be fast.
If you do not have computer knowledge, the best thing you can do is pass all your images through a tool like Optimizilla and once they are optimized, upload them to the web.
Try naming them related to the product or type of image instead of using names like DSC_1043 straight out of your camera.
There are more things that can be done when it comes to optimizing images, but this time you will need the help of an expert.
Reduce the number of apps to the essentials
I want to upsell: Shopify marketplace app.
I want to make a popup: Shopify marketplace app.
I want some filters for the collections: Shopify marketplace app. I want, I want, I want…: App, app, app…
This is the best way to turn a very fast Shopify website into one of the slowest on the market.
Although the apps are very good and are often very useful, they are a big problem when it comes to the loading speed of the web.
And you know, the slower the web, the worse SEO positioning.
So unless it is essential, it is best that you reduce the apps to a minimum.
If it doesn't work on your mobile, you better close
This is not even necessary to mention because practically 100% of the Shopifys in the world are more or less optimized for mobile.
But just in case, without a mobile website your SEO positioning will suffer a lot.
Especially since Google has started to take very seriously the need for all websites to be focused on mobile.
So now you know, don't let your website not work on mobile.
To make sure that everything is correct, you can install Google Webmasters Tools on your website and from there you can remove all the problems that Google sees on your website.
Well, we have finally reached the end.
I think we've covered all the major topics when it comes to optimizing your Shopify website for SEO.
There are always more things that can be done, such as doing a keyword analysis and optimizing the web based on them, more advanced adjustments at the code level, etc.
But what we have talked about is more than enough for any store.
The rest is for SEO PROs.
If you think we have missed something, write to us at hello@onilagency.com and we will be happy to add it to the article or discuss it with you.